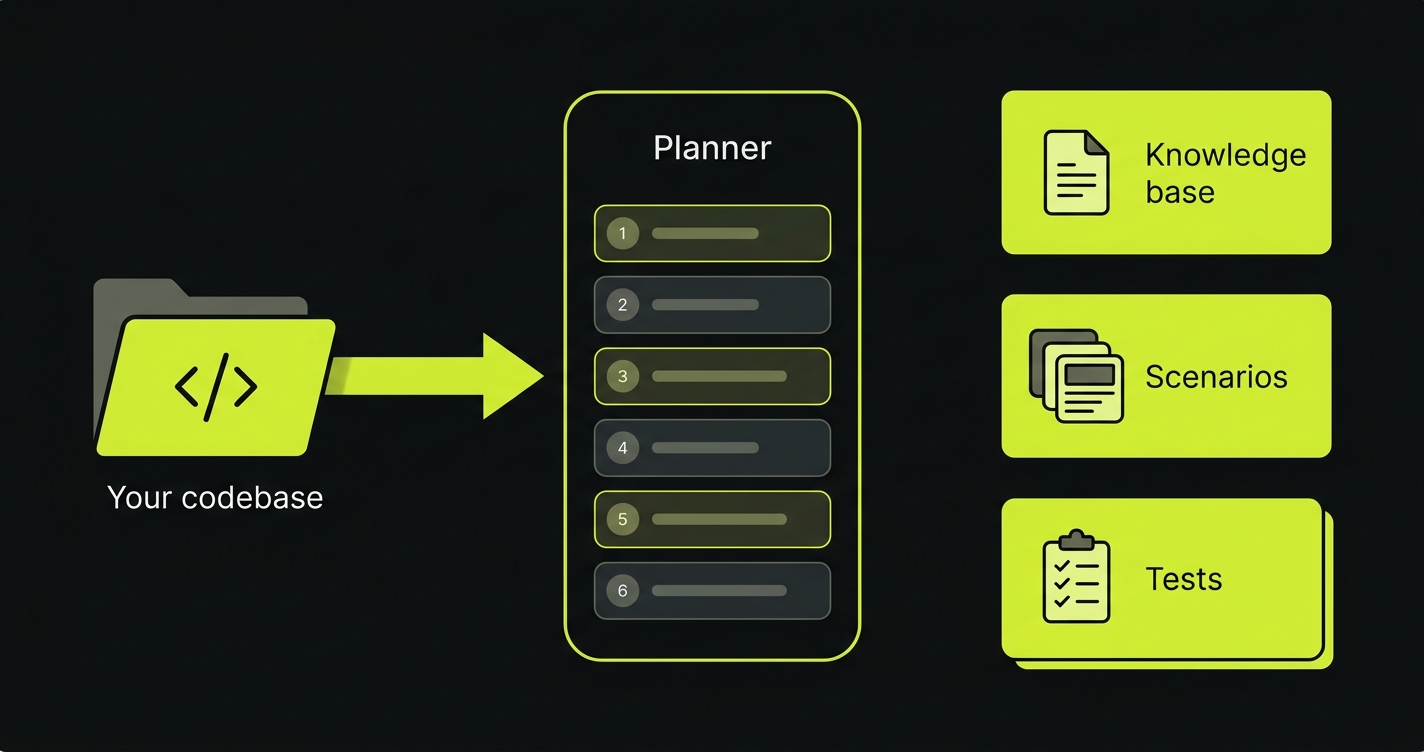
E2E Test Planner

The Test Planner is a Claude Code plugin that takes any web application codebase and produces a complete, production-ready E2E test suite in six steps. Install it once, run a single command, and the plugin handles orchestration, deterministic validation gates, and user confirmation checkpoints automatically. The final output is a set of test files ready to upload to Autonoma, backed by a live Environment Factory endpoint that creates isolated test data for every run.

Installation

Install the plugin from the marketplace:

Terminal window
/plugin marketplace add Autonoma-AI/test-planner-plugin

Then register it with Claude Code:

Terminal window
/plugin install autonoma-test-planner@autonoma

Then run the plugin:

Terminal window
/autonoma-test-planner:generate-tests

OpenAI Codex support is coming soon.

OpenCode support is coming soon.

The plugin runs each step in an isolated subagent and validates every output with deterministic shell-script validation (Python + YAML parsing) — not LLM-based checks. If validation fails, the agent sees the exact error and must fix it before proceeding. PostToolUse hooks validate every file write automatically, and cross-file consistency checks ensure outputs like INDEX.md test counts match features.json feature counts. A hard validation gate prevents test files from being written until the scenario lifecycle has been proven end-to-end.

Before you start

The plugin runs against your frontend codebase to discover pages, flows, and UI patterns, and against your backend codebase to audit entity creation paths and set up the Environment Factory.

Before you start, make sure you have:

  • access to the frontend codebase
  • access to the backend codebase (can be the same monorepo)
  • these environment variables in the Claude Code session:
    • AUTONOMA_API_KEY
    • AUTONOMA_PROJECT_ID
    • AUTONOMA_API_URL

If your frontend and backend are in the same monorepo, you’re all set. If they’re in separate repositories, make sure the agent has access to both.

The six steps

Step 1 — Generate a knowledge base

The agent analyzes your frontend codebase and produces AUTONOMA.md: a user-perspective guide to every page, flow, and interaction in your application.

Consumes: Your frontend codebase. Produces: autonoma/AUTONOMA.md + autonoma/features.json

Step 2 — Entity creation audit

The agent inspects your backend codebase to find the canonical creation function for every database model — typically a service, repository, or similar helper. Models with dedicated creation code get factories in the Environment Factory; models without fall back to raw SQL INSERT. The audit records observed side effects (password hashing, slug generation, external API calls) so you can see why each factory matters.

Consumes: Knowledge base + your backend codebase. Produces: autonoma/entity-audit.md

Step 3 — Generate test data scenarios

The agent reads the database schema directly from your backend and designs three named test data environments: standard (realistic variety for most tests), empty (for zero-state testing), and large (for pagination and performance). scenarios.md records concrete values and relationships, plus schema metadata and generated-value placeholders ({{token}}) for fields that must vary across runs.

Consumes: Knowledge base + entity audit + your backend codebase. Produces: autonoma/scenarios.md

Step 4 — Implement the Environment Factory

The agent installs the Autonoma SDK in your backend, configures the handler, and registers a factory for every model marked independently_created: true in the audit — calling your real service/repository function so test data flows through the same business logic as production data. Models without dedicated creation code fall back to raw SQL INSERT automatically. A discover smoke test plus a factory-integrity check confirm the handler is wired correctly before handing off to Step 5.

Consumes: Entity audit + scenarios + your backend codebase. Produces: A working Environment Factory endpoint + autonoma/.endpoint-implemented

Step 5 — Validate scenario lifecycle

The agent runs the full discoverupdown lifecycle against every scenario, iterating up to five times to fix handler bugs or reconcile scenarios.md with reality. Once every scenario passes, it emits autonoma/scenario-recipes.json, runs a deterministic preflight check, and uploads the validated recipes to the Autonoma dashboard. The .endpoint-validated sentinel this step writes is what unlocks Step 6.

Consumes: Endpoint from Step 4 + scenarios from Step 3. Produces: autonoma/scenario-recipes.json + autonoma/.scenario-validation.json + autonoma/.endpoint-validated + uploaded recipes on the dashboard.

The upload contract for scenario-recipes.json is documented in the Scenario Recipe Schema reference.

Step 6 — Generate E2E tests

The agent produces an exhaustive set of test cases as natural language markdown files, using the validated, reconciled scenarios from Step 5. Tests are distributed across tiers: core flows get 50-60% of coverage, supporting flows get the rest. The suite includes happy paths, input validation, state persistence, navigation, and cross-flow journey tests. Variable-field tokens are referenced symbolically so the test runner can substitute real values at execution time. An adversarial review agent runs after to find gaps.

Consumes: Knowledge base + validated scenarios + scenario recipes. Produces: autonoma/qa-tests/ directory with test files + INDEX.md

How the steps connect

  • Step 1 output feeds every later step — the knowledge base tells subsequent agents what the app is and what the core flows are
  • Step 2 output feeds Step 4 — the entity audit decides which models get factories and which fall back to SQL
  • Step 3 output feeds Steps 5 and 6 — scenarios define what data to create and what tests assert against
  • Step 4 produces the endpoint Step 5 validates against; it does NOT run up/down itself
  • Step 5 is the critical gate — it proves the scenarios actually work against a real database. Its sentinel unlocks Step 6. If validation fails, Step 6 is blocked at the hook level.
  • Step 6 consumes the (possibly reconciled) scenarios as the source of truth for test data

How validation works

Unlike prompt-based validation, the Test Planner uses deterministic shell-script validators at every step:

  • PostToolUse hooks run after every file write, catching structural issues (missing frontmatter, invalid YAML, wrong file locations) immediately
  • Step-level validators run Python and YAML parsing scripts to verify the complete output before the next step begins
  • Cross-file consistency checks ensure inter-file references are correct — for example, INDEX.md test counts must match the actual number of test files, and features.json feature counts must align with the knowledge base
  • Preflight on scenario-recipes.json verifies every scenario has a recipe, every token is declared, and the tree roots at the scope entity
  • The validation gate blocks test-file writes until autonoma/.endpoint-validated exists

If any validation fails, the agent receives the exact error message and must fix the issue before the plugin allows it to proceed. You never end up with a broken intermediate output feeding into the next step.

Review checkpoints

The plugin pauses after Steps 1–5 and asks for your review before the output is consumed by the next step. These are not optional — getting them right determines the quality of the final test suite.

After stepWhat to reviewWhy it matters
Step 1Core flows identifiedDetermines 50-60% of test coverage weight. Wrong core flows = poorly prioritized tests.
Step 2Entity audit — factory vs raw SQL classification and identified creation functionsDecides which models run your real business logic during tests. Wrong function = tests that bypass important side effects.
Step 3Scenario entity data + variable fieldsFixed values become direct assertions; variable values become tokens. Wrong names, counts, relationships, or variable markings = brittle tests.
Step 4SDK implementation plan (endpoint location, factories, auth callback)Ensures the backend integration, secrets, and factory wiring are correct before code is written.
Step 5Validation results + any edits made to scenarios.md + uploaded recipesConfirms the scenarios are feasible against your real database. Any agent edits to scenarios mean the original design missed something — worth reviewing.
Step 6Test distribution + journey/critical test samplesConfirms assertions reference real UI text, not vague descriptions. Validates coverage weight across tiers.

Each step page explains what to look for and why it matters in detail.

Link copied